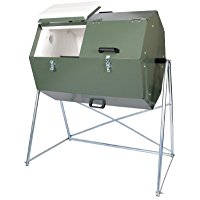
Upgrade Your Composting With a Twin Chamber Composter
A two chambered tumbling compositor for all your composting needs. Let’s look at the Mr. Spin twin chamber tumbling composter. In a popular video on composting that we posted earlier we showed you how easy it is to set up your own composting bin and in today’s article we’ll take it a step further and show you how to set up a tumbling composting bin. We got our two chamber tumbling composter and we also got a compost thermometer
from Cate’s garden on Amazon. Both are great products and I’ll provide links to these products below.


Now let’s begin by unboxing our package. Our composting tumbler came neatly packaged in this box and this is basically the separator that separates the two chambers in the composting bin and then there are a lot of steel units that serve as stands for the composter. You can see in this video that there are a lot of these connectors and you will shortly see how to get these connectors together and here you can see we have all the sides of the composter. Also you can see here all the parts that are needed to assemble this composter. These are the sides and these are actually the the plastic sides that will go on to making the compost bin and then there are some sort of nuts and bolts that you’ll be able to assemble the unit with.
Now let’s begin with the assembly you need to first assemble the door. As you can see here this is actually the door of the composter. It has a sliding door which will easily fit on to the side as you can see here and once you figure out where to fix the sides and they align with the holes for the nuts and what you do is just insert the nuts and tighten them using the bolts. The manual mentions that all these should be tightened very well. Now you can either hand tighten them now and then tighten them later with a screwdriver and a set of pliers or you can just do it right now while you’re assembling the parts. You can just make sure that the screws are tightened using a screwdriver and a set of pliers. I found it very easy to use a set of pliers to tighten the screws as you can see you just hold the screwdriver from one side. Use a standard Phillips screwdriver and then just hold a long nose plier and make sure that you are tightening the screws properly.
Now it’s time to set the other side of the composting bin this is basically a circular tumbling composter and it has two chambers and then all you need to do is just hold on to the other side as well and then tighten the screws. As you can see here we have now assembled the door and it’s now time to tighten the nuts and then move on to assembling the other sides. Now you will see here we have the door assembly in place and one of the sides installed as well and here I’m going to show you how to install the other sides and the piece just slides into the piece that you just assembled and once the piece slides in all you need to do is attach the nuts and then tighten it with the bolts from the bottom so the entire assembly is based on a nuts-and-bolts. All you need to do is assemble the pieces and then put in the nuts and then tighten it with the bolts from the bottom. The separator is a hexagon-shaped separator that will separate the two chambers of the compositing bin and as you can see here it’s a little tricky to set it into place but once you set it into place all you need to do is continue adding the other pieces of your composting bin and they will then align with this separator very easily.
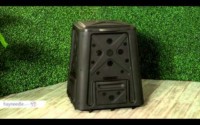
As you can see here the separator is now in place and you can now slide the other piece to the piece that you just installed and align the separator so that it aligns with the new piece that you are installing and then as usual you take the nuts and then push them through the slots and then tighten them with the bolts that you have. And as you can see here we are now continuing to install the other parts as well on the sides and all these sides make up your composting bin and they just align with each other, and you keep adding the pieces till you have no more pieces left. Making sure you add the nuts and the bolts at every stage as you can see here after you have installed all the sides your compositor should look something like this with the two doors giving you access to complete the last nuts and bolts that are left and once that’s done your compositor should look something like the one you see here.
Then you need to slide in the support shaft through the compositor and you have to first open the door try to align it on one side and then move over to the other side and then open the door and then try to push it through the hole on the other side. Once that’s done this actually forms the tumbling base for your composter and it’s a pretty simple design. All the composter does is it rotates on this shaft that you see here and these are the sides the stands that will hold your composter. It only aligns one way so make sure that you are aligning the stand such that your composter can actually set on the stands. It should look like as you can see here will be now attaching our final piece to complete the assembly and they just slide into each other and lock into place so it’s pretty easy to set these up. Finally we’re going to be setting our composting bin on top of this stand and as you can see here it just fits very easily onto the stand and it’s not secure yet. We are going to be securing these with additional nuts and bolts on the sides. So what you do is just take the nut and then tighten it with the bolt on the side of the shaft that attaches to the stand and do the same thing on the other side as well. I’m holding a wrench in place to tighten the bolt here and you need to do the same thing on the other side as well and now you can start loading up your composting bin. You will notice here that there are two chambers and will not be surprised to see that this composter holds a lot of material.
You can start filling up one side and once you’re about 3/4 full you can stop and then start filling the other side. I have some worms that I’m gonna add to the composting bin as well. They do a great job with composting your kitchen scraps. This chamber, the first chamber, is going to contain some scraps and some compost that is not completed yet and I’m going to let this cook for about two to three weeks and this is how the composting tumbler works. You basically can rotate this composting bin and the material gets mixed thoroughly it’s also exposed to air and this really speeds up the composting process. So instead of having many holes in the composting bin there are actually some holes but not very visible. The tumbling action is what causes this compostor to compost waste very quickly. Now once you are done with one side you can switch over to the other side start adding kitchen scraps and a gentle rule of thumb is that for every part of that waste that you add now wet waste could be kitchen scraps, things that you have like leftover vegetables and peels. You need to add about two times carbon source.
Now a carbon source could be something like dried leaves. We have a lot of
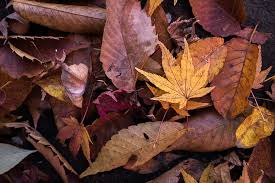 dried leaves that we collected from under our trees and this is carbon waste that can be added to your compost bin and for every one part of green waste add two parts of dry waste. This is very important for your composting process and every time you add some scraps you need to make sure that you’re tumbling the compost, mixing it well.
Now let’s look at how to remove compost that’s already made in the composter. This is compost that is not 100% ready but I’m still removing it so that I can add it to my raised beds. Now the easiest way to remove the compost is to lay a tarp below the composter and then shake the composter till the compost comes out. The compost is looking quite good and your compost should not be smelly, it should have a nice earthy smell but not smelling foul. As long as you add your waste correctly and as long as you’re keeping your composure aerated which means that you are tumbling at every few days your compost should be very nice not too smelly and not too moist as well. as you can see here this is pretty much how your compost 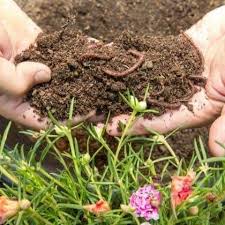 should look like and it should be a little more finish than this I’m just removing it earlier so that I can add it to my raised beds and the chamber is empty now. While we emptied one chamber the other chamber is still cooking. So that’s the best part of this composter. You can still make compost while you are using the compost from one chamber and all we’re going to do is add it to our raised bed and then spread it around our raised bed. Now you can either leave it this way or what I like to do is I like to dig it into my raised bed so that it gets mixed with the contents of the raised bed, the native soil as well as some soil that was existing in the raised bed and that’s always good because it lets your compost get into the deeper parts of the soil. I usually do this with the compost that I add to my raised bed and you’re gonna see a lot of earthworms a lot of other insects in your compost and that’s always a good sign you want your soil to be full of life. Now one of the problems that everyone faces is how do you get a lot of dry waste or carbon source for your composting bin. We all have a lot of wet waste from our kitchen scraps but how do you get a lot of carbon source or dry waste? Well I have a little trick for you. Just use your kitchen scraps, your wet waste and then dry it in the sun in an aluminum foil. You will see that once this dries it actually becomes a carbon source or dry waste. Now this might not give you a lot of dry waste but if you have grass clippings you can just lay them in a tarp and then dry it in the sun. You can also rake dried leaves from under your trees and I usually use a leaf mulcher to pick up my leaves and then I lay it on a tarp and that gives me a lot of carbon source for my compost.
The next product that’s very useful for your composting needs is this compost thermometer from Cate’s Garden. Now I’m not associated with this company. This is just an honest review of the product and I thought this would be definitely useful for your composting needs because it lets you view the temperature for your compost bin. It’s very neatly packaged and it has a little guide on the back which tells you what your compost temperature should be while you are composting and as you can see there your compost can either be warm, it can be active or it can be hot and there’s a little coupon inside as well for your next purchase. It looks like a great quality product, very well-built and solid construction and what I really liked about the product was the ease in which it can be used for your compost temperature measurement. It has this dial that has very intuitive easy-to-read colors which tell you how your compost is doing. So the thermometer itself has this long thermometer base and then this dial. The dial is pretty intuitive. It has these colors dark green meaning your compost is hot, light green means it’s active and then you need to make sure that your compost is at least in the light green or preferably the dark green area, so when your compost is hot composting it will compost very quickly and you won’t have a lot of harmful organisms in your compost. So the compost thermometer is a great way to know if you’re doing well, on how your compost ingredients are, Now if your compost thermometer does not indicate that you have an active compostor, a hot compost it usually means that your proportion of wet waste to your dry waste is not good so just make sure that you are following the rule of one part wet ways to two parts of dry waste and you should be good.
If you want more tips on composting please do check out our articles on composting that we posted earlier. We have a lot of details on what needs to go into your composting bin and what does not. So there we have it folks that was our episode on composting and how you can use a tumbling composter along with a compost thermometer to get the best compost that you can. Happy gardening and here’s the links I told you about.
VermiHut Plus 5-Tray Worm Compost Bin Review
Redmon Green Culture 65 Gallon Compost Bin Review