Six Different Ways To Compost, No Matter Where You Live
Different Ways To Compost
Different Ways To Compost. If you’re curious about compost, but you don’t know either what it is or just how to get started in a practical way at home. This video is for you. Kevin Espiritu here from Epic Gardening where it’s my goal to help you grow a greener thumb. And you know when I started gardening, I didn’t understand either what compost was or how to make it. And so that’s what we’re going to demystify in today’s video. We’re going to talk first of all what it is and why it’s so important.
And second of all, we’re going to go over six different methods so that no matter who you are, where you live, what your circumstances are, there’s at least something that you can do to start using some of those food scraps, that green waste, that brown waste on your property, and turning it into super rich compost for your garden. So without further ado, cultivate that Like button for Epic compost heaps. And let’s get into the video. By the way, if you live in an apartment, I have not forgotten about you. At the end of the video, I’m going to go over three different cool countertop compost bins that you can use to make better use of your food scraps.
Purpose of composting
Quick primer on compost in about 30 seconds before we get into our six methods.
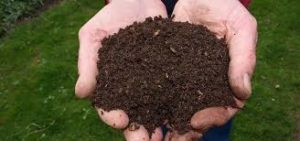
Firstly, what does it actually do for us? Well, it improves the nutrients in our soil. So our soil life can then further break down and make bio available to our plants. Number two, it improves the water retention. When you add organic matter, your soil can actually hold more water. It’s actually one of the best ways to improve clay soil. So there’s a whole lot of benefits and really it’s just organic matter that’s being broken down. Bacteria, fungi, insects, all sorts of things are breaking it down into smaller and smaller parts. Then eventually it can actually be taken up by your plants to create some epic harvests. Okay, now let’s get into method.
Number one
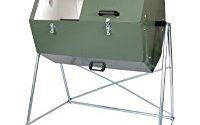
Well, method number one, no surprise is the tried and true hot composting. Now what you’re doing with hot composting is you are making sure that heat does not escape the system. Because this is just a sped up version of normal decomposition. Now what you see here, it’s called a Biostack. It’s about a three by three by three foot system. I actually don’t think this is available anymore, which is a shame because it’s a really cool good system and it’s got these covers. But the thing that I particularly like about it is it deconstructs in thirds. This means that you can just use the compost as you wish.
You can kind of make yourself at home and just use exactly what you need. But what the benefit of hot composting is is number one, you can do it in large volumes. And so again, at minimum you need a cubic yard to get that biological activity going. But a lot of people, including my friend Charles Dowding who does this at an insane scale. In fact the compost he generates on his property is all of the fertility he adds to his garden. He has a three or five bin system. Those are huge bins. You can actually check my tour out with him and it’s fascinating to see how he does it. But the benefit is faster, the benefit is more volume, but the downsides are that there’s quite a bit to manage.
High temperatures required
You need to get it up to a least 110 degrees. In organic certifications, I believe you have to get it routinely up to about 160 degrees Fahrenheit, which means you have to turn it quite often. You have to manage the different amounts of carbon and nitrogen, which is about a 25 or 30 to one ratio of carbon to nitrogen. You have to make sure that it’s adequately moist, there’s enough air and so there can be a lot to manage here. Which is why if you’re lazy, you may want to opt for the next method.
Number two
If you are a lazy gardener, and I confess I sometimes am this way, then the second method is going to be perfect for you. It is passive or cold composting. Effectively just imagine that compost pile you saw in tip number one, that you just stop turning and stop managing. That’s exactly what we’re talking about. Now I have a little garden bin here
that I keep all of my, you know, greens and browns that I’m pruning off.
So I have this Bouganvillia here, or if you’re my Filipino grandma you would call it a Bougainbillea. And I don’t want this right here, so we’re going to prune that off. Now this could be chopped into really small pieces and it could be mixed into the middle of my hot compost bin and it would break down really quickly. Or as I will do, and do quite often, I just chop it up a little bit further and I’ll leave it in this bin until I want to transfer it somewhere else. And you just pile it up, pile it up and let nature do the work. What happens there is often you’ll get these pincher bugs, you’ll get earthworms. A lot of different things will come in.
Downsides
Now what are the downsides to this? Number one, it’s a lot slower. You’re not taking advantage of all theinherent benefits of hot composting, so you are losing that. Number two, if you throw food scraps and stuff in here, it’s not protected and so you’re going to get probably some more rodent and pest pressure. And really that’s it. The benefits are that it is just extremely easy. You just set it and forget it. You’re basically just mimicking that forest floor or that natural decomposition process. So if you are a little bit lazier, this can be the perfect method for you.
Number Three
The third method is actually a method that I don’t have on my property right now, although I used to compost this way. And that would be using a compost tumbler. So put on your imagination cap and just pretend like this is a compost tumbler. I’m going to put some up on the screen as well. But basically these were invented to solve two of the annoying problems of hot composting. And that would be managing that aeration and mixing the components so that you always have fresh stuff in the middle so that most of that heat and that biological activity can break down the freshest, most un-decomposed stuff. And so what you’ll do is typically you either have a one or a two chamber compost tumbler and what you’ll do is you’ll fill it up. It still has to have that bulk amount of material.
You still need that, that space and that volume to be filled so that that biological activity can perpetuate itself. But then what you’ll do is. Let’s say I filled this whole tumbler up and typically they’re on, you know, little stands of some kind. And what you’ll do is you just turn it every couple days. So you can manage the mixing and the aeration a lot better. Now, there are some significant advantages to that. The advantage that’s most stand out is that you just make compost faster. You know, a lot of these tumbler companies say, oh, you’re going to make compost in two weeks, three weeks. I find that that’s still a little aggressive. I would say a month, two months, and that’s still faster than hot composting, especially these larger volumes.
My Backyard compost tumbler
Now, why do I not own one and why am I using a cloche as an example compost tumbler instead of one? Well, I used to own one. I used to own the Yimby. Yes in My Backyard compost tumbler, I believe it was called. And what I personally found is number one, it still was kind of annoying to manage. Number two, you get, if you ever have any rain, you’re going to get leakage out. Because there needs to be holes in a tumbler in order for it to actually work, right? You can’t just completely seal it off. I had some really annoying issues with getting tons and tons of of black soldier fly larva aka maggots in there, which isn’t necessarily the worst, but at high volumes it can be bad.
And I honestly just found like it was a little more annoying to manage than my hot/cold compost pile out in the front yard. Now there are some significant benefits if you’re in smaller spaces. If you’re on a patio, if you really have pest problems in a hot or cold compost bin, then lifting it up off the ground and tumbling it and turning it over faster can be a really good idea. So I don’t want to knock it, it’s just not personally for me, but it can be a fantastic option for you.
Number four
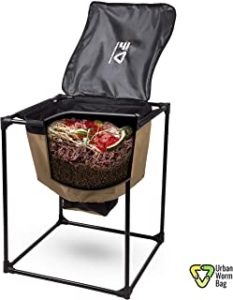
Which is my favorite method and is vermicomposting, also known as worm composting. Now the bag that you see here is probably unlike many of the bags that you typically see. I actually did a video on how to build a stackable worm tote for about 20 or 30 bucks that I highly recommend if you prefer the more stacker method. This is what’s known as a continuous flow-through system, so it’s a completely sealed single chamber, which I really prefer both for ease of use, for the smell. It really just doesn’t really look like a worm bin. You don’t get insects flying in and stuff like that. So I really, really prefer a continuous flow-through and specifically this bag, the Urban Worm Bag. But really worm composting is so fantastic,
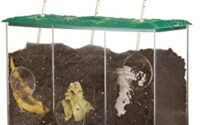
First of all, just intellectually interesting. It’s great fun to see how these worms interact. But what you’re doing here is you’re adding some bedding, so that’s kind of their base layer. Consider that coconut coir, shredded paper, things like that. The next thing you’re doing is you’re taking your food scraps, you’re chopping them up nice and fine. The smaller the better because there’smore surface area for them to work on, and you’re layering. So you do a couple inches of bedding, couple inches of of food scraps, etcetera. And then you add in some worms. In this case I added about two pounds of worms to start and that’s the only worms I’ve ever added and it’s been about 18 months. And they just self-regulate.
A fantastic system
If there’s not enough food, they won’t reproduce as much. If there’s an overabundance of food, they’ll reproduce like crazy and they’ll make quick work of it. And so it’s a fantastic system. And what happens is you basically are just putting stuff in the top and the worms are making their way through. So let’s say, let’s say this thing is completely full. It’s completely full, I’ve got bedding and food scrap layers on the top 50% and let’s say the worm castings are on the bottom. That’s their excrement, which is basically our fertilizer. Well, they don’t really like to live in that. And so these worms, the red wigglers, they like to climb upwards and so they’re going to be in this upper 50%.
Now when I come down and pull this drawstring down here and squeeze out some of that worm castings, there’s not going to be a whole lot of worms in there, which can be an issue with some of the stacker systems. So I can just pull out once every couple of weeks a nice amount of worm castings, which are roughly a 1-1-1 NPK, and just add them straight into my garden. And I’m adding a ton of microbial life, some great micro nutrients, some great trace minerals, and it’s just a fantastic way to make really fast compost at home.
Number five
Method number five is the most exciting. If you don’t have enough space and you only have enough space for maybe a five gallon bucket on top of that, if you want to compost things that you shouldn’t compost like dairy products, fats, oils, bones, meat products. If you have that and you want to make use of it, then the Bokashi composting method is the one for you. Now it takes a hard left turn from all the methods we’ve talked about because it’s anaerobic, which means without oxygen. And what that means is we have a completely sealed five gallon bucket. Now I have an entire video on exactly how I both built this bucket and the results. I went straight from like a two to three week process from food scraps all the way to buried in ground and the results.
So I highly recommend you check that out. But in a quick nutshell, what Bokashi is is you’re using an inoculated brand type of product. Basically it’s lactobacillus and a couple other different strains of bacteria, and you layer the brand. Let’s say you put some brand at the bottom, scraps, brand scraps, brand scraps, and then you put a cover on top and you let it just be. What’s happening there is it’s fermenting. It’s actually sort of pre-digesting this and then when you’re ready, which is usually about two weeks or so, you throw that out into the garden, bury it and it just vanishes. It just disappears. It’s fascinating how quickly it happens. On top of that, you can also throw it into your hot compost bin, your passive compost bin, and it breaks down even faster.
Benefits of Bokashi
So there’s a lot of different benefits to Bokashi. Let’s go ahead and look inside, cause I haven’t opened this in a while and I’m a little scared at what I might find. Okay. The moment of truth is here. Let’s crack it open. Prepare my nose. So this was the plate that I use to seal it off. So it’s got a little bit of growth on it. Not a big deal though. Now down here you can see there’s quite a bit of white mold growth on it and you might think that’s bad. It’s actually not that bad. That’s actually kind of what you’re supposed to see.
Now I can take all this material right here and it’s looking a little, you know, it looks okay actually, and, and bury this and it’s gonna break down extremely quickly and become bio available to my plants. So let me just put this back to restand. Let’s move on to our final method.
Number six
Our sixth method, which is the pinnacle of laziness or efficiency, depending on how you look at it, is just taking food scraps and burying them directly in the garden. Now, I really can’t say a whole lot more about this that my friend Mark over at Self Sufficient Me hasn’t already said in an absolutely fascinating video that just went absolutely viral. So I highly recommend you check out Mark’s video to see what happens when you bury fish, when you bury tomatoes, when you bury foods scraps directly in the garden and stand the test of time. But they will break down and you will see good fertility added to your garden.
Now some of the downsides might be if you’re burying things like fish heads or food scraps and you have digging pests, then they’re probably going to dig it up and they will dig your garden up as a result. And for that reason, most of my composting happens in my passive or hot compost bin depending on how well I’m managing it. Or my worm bin because they’re sealed and I can protect from any sort of rummaging pests. But if you want to bury you certainly can.
For apartment persons
So apartment people, I did not forget about you. I’ve been an apartment person and this is how I’ve solved it. So this one is called the Chef’n EcoCrock. It’s just kind of a cute little countertop compost bin. And you might be thinking, okay, well if I’m in an apartment I can’t actually really compost. Well if you don’t want to use one of the methods we’ve talked about, this is a great way to just collect food scraps and you can either drop them off at a local compost recycler. So you kind of trade food scraps and you get compost back, which is a really good way to do it.
You’re outsourcing your compost, but you’re giving food scraps in return. So this one’s really nice cause it’s heavy duty. This is like a porcelain type material. Cute little top. But then the thing that seals the deal for me is boom, you’ve got a removable pail that you can just take out and it’s got a little smell capture filter there. Now there’s a couple other ones that I kind of like, but obviously the one I have is the one I like the most. There’s the Polder which is about one gallon size, has a bit of an industrial look. And then there’s the Epica which is probably the most popular one, at least on Amazon, and it’s got about I think a 1.3 gallon stainless steel look. Basically the same as this but just looks a little bit less cool I think.
What to do
So if you’re in an apartment, this can be a great way to collect and re-purpose food scraps. Whatever method you use to compost I think it’s important that you at least do try one of them. Even if it is just grabbing that countertop compost bin, trading it out for some food scrap sand really practicing making use of the outputs of your home. Your kitchen, right, your coffee grounds, your eggshells, your chopped up ends of vegetables and re-purposing it. And seeing what it can turn into.
Cause remember, you know for example, this bean plant, how much we use of it. We use the beans. We don’t really use the rest of this. And so we should do something with that. And we should find ways to re-purpose and make the most out of it. So I hope this was helpful. If it was, tell a friend, drop a comment, throw a Like, throw a subscribe. And until next time guys, good luck in the garden and keep on growing.
100-Day Time-Lapse 3-chamber Carbon-only Worm Bin Vermicomposting
Five Tips to Make Garden Compost Faster