Worm Bin Horizontal Migration Management
Worm bin horizontal migration
Hi everyone and welcome. I’m down here, in my wormery, and I was going to check in on my oldest worm bin that’s right here next to me. It’s a red wiggler bin and it’s been in service, for I believe, 145 days, 155 days. I can’t even remember at this point. Hey Siri! How many days have passed since June 22nd? It was 144 days ago there you go. 144 days ago. So this worm bin has been in service for 144 days. Over the past few weeks I’ve been trying to really bring closure to the bin.
Now I had stopped feeding it for a while, and then I sent it through this stage of what I had originally started calling starving phase. But more recently I like to refer to it as a foraging phase. Because during that time you’re really giving the worms a chance to really pick through the material and eliminate all the remaining little scraps of bedding and food that might still be in there. And then, when the time came to start feeding again, the feeding was done in a very specific way, which was meant to try to lure the worms out of the finished compost?
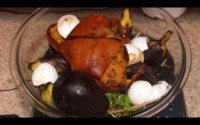
Feeding zone
So let me bring in a little bit closer to see what I’m talking about over here. So the edge of the worm bin. That’s a little bit closer to us. Over here is where all the finished compost is underneath the brown paper bag and then back there on the other edge of the bin, was where I had started setting up the what I refer to as the horizontal migration feeding zone. Feeding zone is clear enough, but the horizontal migration concept is the part that attempts to allow the worms on their own to simply migrate out of the finished compost over into where the fresh food is being replenished over here.
Next to this oldest worm bin of mine, you can see the second oldest bin of mine. This recently completed the same exact process, and in this bit I’ve already gone ahead and relocated the worms and I’ve got nothing more in here than a bunch of finished compost.
Moisture
It’s really just a matter of dumping this stuff out of this container at some point. But for now it’s underneath the plastic to let it hang on to the moisture that’s in there, so as to not let it dry out too much and it’s that moisture, that I wanted to talk about a little bit. In this bin right here where the migration is still in process. So why don’t we go ahead and get this bin up onto the bench and we can take a closer look?
So now my main reason for even coming down here today was to deal with the moisture in this bin, because I think the moisture in the bin is one of the main things that really helps drive the migration of the worms out of the finished compost. Because the finished compost might already be depleted of what you see as the typical types of food that you give the worms. But I bet you there’s a lot of stuff in this remaining that they can continue to whittle away on if they wanted to.
Moisture level
As long as the moisture level in the material was something that they favor, as they like dampness, and I believe that as long as there’s nice dampness happening down in this material they might not be very motivated to exit the material.
However, if the material really starts to dry out a lot, then you can almost bet, you know dollars to doughnuts, that those little guys are going to go looking for a slightly more moist and comfortable place to be. I mean, ultimately, the moisture is the key to them even being able to breathe since they breathe through their skin. They don’t have lungs and they don’t breathe through their mouths. They extract the oxygen out of the air and out of the water through their skin and without moisture.
Will suffocate
Therefore, they’ll basically suffocate. So anytime the material in the bin begins to dry out a bit that’s when the worms are going to really start to go looking for a better place to be. I think that that other bin that we looked at a moment ago, really worked well because in that bin I had never really experienced too much of a moisture issue like I had actually experienced in this worm bin. And this bin, I had just gone way overboard on adding I don’t even remember. It might have been a lot of watermelon or something with a lot of moisture content to it.
And then I made the mistake of keeping the plastic bag that often covers my bins on there, rather than allowing that excess moisture to evaporate off. What I ended up with was a very muddy gooey, sticky mess. It was so bad that i had eventually wanted to just leave all the coverings off of it and blow a fan across the top of it to allow it to shed a lot of its moisture, and luckily that worked within about a week and a half.
Better material
I had much better material in here. But I believe that that was a pretty big setback, because, besides the fan, I had also used a bunch of dry leaves in in the bin to try to use those as sort of like little sponges to suck up any of the excess moisture.
I believe that that was part of my kind of undoing, because it was rather late in the game already and to use bedding like leaves that late in the game is pretty much going To guarantee that you’re going to end up with a whole bunch of the little leaf stems remaining in your material, which will take always a lot longer to break down than just the the soft leafy portion of the leaves.
Different bedding
So I believe that despite the moisture I probably could have kept this worm bin on track a little bit better had I used a different type of bedding to try to combat the moisture.
But I believe it was just a cascading series of events where the moisture led me to want to use what was handy for me, which was leaves and then just the presence of a lot of slow composting bedding in the form of leaves being added resulted in a material that’s now littered with little tiny food bits everywhere, and you know I did talk about how moisture in the bin is probably a pretty good motivator to get The worms moving looking for a better place to be, but the absence of food in the container is also a pretty important piece of it.
Drying process
So, ultimately, my only reason for coming in here was really nothing to do with feeding or anything. It was really just in the interest of trying to make sure that the material is going through a nice drying process, while it’s being migrated further motivating the worms to exit the material, and I believe that one thing that helps a lot is To agitate the material because it’s right here at the surface, with only that piece of paper covering things as you saw before, the piece of paper is actually even full of holes.
So I believe, even where this piece of paper was right underneath where the holes were before, I start everything up here on the surface, I did see pockets of stuff. That was actually very very dry, but you only have to go down a little bit within the material and you start hitting stuff that’s right away, it’s a lot cooler.
Stir the material
It’s a lot more damp so to try to help the process. My only idea down here today was to stir the material up a little bit and get some of the more damp stuff that’s down low up higher and send some of the more dry stuff out on the surface down lower and that’s really my only mission here within the bin. But I figured as long as I’m coming down here to do a little bit of moisture management within my migration, i would just shoot a little bit and talk about the topic too.
So now part of what I’ll do sometimes is just stir things up, but one mistake I don’t want to make, is stirring up this section that’s closest to the feeding area. Where I’m, hoping the majority of the worms are, and I don’t want to end up moving a lot of the worms further away from where I want them, which is over there.
Be careful
So when I stir up this section of the container, typically, I’ll try to not move anything in this direction because in most cases there’s going to be worms in the material. Still, you know if they’re already, this close to the feeding area, I’d like for them to stay there close to it, so that eventually they’ll actually make their way over into the feeding area.
Don’t displace worms
So I want to do this in such a way that I do get the moist material stirred up and the dry material sunken down, but in such a way that I don’t displace too many of the worms or distance them from the place.
Where I do want them to eventually end up which is over in the feeding zone, so I’ll start over on this end and as we can see already, there’s a good number of worms still within this material needing to Make their way over into the into the feeding area into the horizontal migration feeding zone? But I think just by stirring things up there’s also the advantage of there being a lot of little air pockets.
Now, throughout the material that I’ve stirred up and here’s another example of what I was referring to earlier. If the worms are in a material that’s fairly damp and cozy, and there’s, big chunks of food, like that in the material still there’s probably not going to be a great deal of motivation for them to exit. So in a situation like this, where there is a lot of leaf littered throughout the material, it does seem like prompting dryness within the bin is probably my better bet if it comes to trying to get the worms to bug out.
Worms migrating
Right away you can already see we’ve only moved over you know four or five inches in the direction opposite of where the feeding zones been getting replenished with food and everything right away. We could see far fewer worms so I believe that, as they kind of roam around and are checking different things out, they do obviously sense that there’s food over there and moisture, and they are gravitating towards that end of the bin, Which is where I want them to be.
I really had wonderful success with the other bin that we saw a moment ago that bin had never gotten overly damp, so i never ended up pouring in a bunch of dry leaves like I did in this bin. So there’s, nothing along the lines of any of this in there that material is much cleaner, and that was probably one of the main reasons that the worms migrated out of that material rather quickly.
I had migrated the worms out of that material completely within 18 days, two and a half weeks and in the case of this bin I believe we’re already at the point where we’re approaching that same time frame.
Migration nearly complete
So I believe we’re somewhere in the neighborhood of about 16 days with this been already so I think we’re only a couple days away from reaching the point in time when if all things were equal, then this would have already been pretty close to, if not already completed with its migration, but between all the residual scraps of food in the material as well as um.
I believe the material itself being a little bit more damp throughout than it was in the other bin. At this point, in its life cycle, there’s, probably um a lot less reason for the worms to want to leave the material.
So I’m, going to have to anticipate a little bit more time for this horizontal migration to complete. But you know I’m learning, as time goes on every time. I do something well in one bin like i did in that other bin, but then also do things perhaps not as optimally as I did in this bin. So I try to learn from those things and try to give myself little reminders that hey the next time i do this. I may want to feed a little bit differently.
Fewer types of material
Perhaps use fewer types of materials that’ll take a long time to break down so that when it does come time to migrate, I’m not left with material that’s littered with all kinds of food Scraps that’s going to work against me.
You know not only the food but the bedding too. If you’re using your bedding to control your moisture, then the type of bedding you’re using such as leaves with their sticks, could end up working against you in the long run.
So maybe maybe a bedding that i could have used instead of the leaves here to sop up moisture, maybe a paper or something like that would have worked a little bit better. So just all food for thought – and you know I actually had put together just a little illustration here – that I thought we could talk about a little bit before i uh before i wrap up here, because I’ve, already more or less taken care Of what i wanted to take care of in this bin with regards to you, know agitating the material and trying to um, you know spur on the drying of the material, but um kind of as some parting thoughts.
Regarding horizontal migration
I put some notes together here regarding horizontal migrations of your worm bin. When you’ve already got a tub that’s, basically finished compost. So you know, after you’ve completed what you consider to be the feeding stage in your bin um.
I often like to think that, before you know stepping forward to the migration aspect of it, it’s. Probably a good idea to have a little pause in there with no feedings, for perhaps a few weeks I believe in this bin.
The foraging only went on for about maybe two weeks, two weeks and two days, I believe not even two and a half weeks, whereas in the other bin too, that foraging stage went on for in excess of three weeks.
I believe it was 24 days in the case of that other bin, which probably also helped a lot, in that case too, and then um and then eventually, you know switching over to the migration and start giving them food again, but giving them food in a way That you know it’s very focused on one end of the bin, trying to get them to you know, exit the finished compost so that you can harvest it out of the bin.
The considerations
So you know, the considerations are those things that we’ve already talked about. Is the, the types of foods and the bedding that you’re using? You know moisture content, you want to just be careful if you’re, adding very moist damp materials, maybe do that in a way that goes hand in hand with also allowing the bin to adequately ventilate – and you know shed some of that moisture so as to not end up with very damp sticky material in the bin.
Likewise, the use of the bedding that goes hand in hand with the food. Sometimes maybe in the beginning it’s okay, to use a lot of leafy stuff that’s you know also going to bring with it a lot of these little sticks and stems. But perhaps later on, if you’re going to start using the bedding to facilitate the other bullet point here, which is Your moisture management then you might want to also take into consideration the fact that you want that bedding to be such that can be easily broken down.
Helping drive the migration
It’s not going to end up littering the material on and on, and you know ultimately end up slowing it down when it comes time to try to you know bring closure to the bin’s life cycle. So the moisture management also in the end ends up helping drive the migration because, as the material dries out more and more, the worms are going to find themselves not wanting to be in it and that’ll, send them over into your migration zone.
Moisture recirculation
Where you’re managing the moisture in such a way that the plastic over the top of it allows for the moisture in there to recirculate making the area over there a lot more damp a lot more appealing to the worms all right.
So this was really my only intent was to come down here. Give this bin a little bit of an agitation. Hopefully you know assisting it in its ability to get rid of some of the moisture you might have noticed along the way too.
I was picking out things that are larger scraps of food that I found within the material. Simply moving them over into the feeding area, because every time I do encounter a larger chunk of food out here, I see that also as something that’s going to work against me. And you know the less of that there is in the finished compost the less. I think the worms are going to want to stay in the finished compost, but you know what, as long as we’re here I’m just curious to see how things are holding up in this feeding zone.
Reinforce food supply
So I believe that it’s already been about four or five days since I last came in here to reinforce the food that was in here to make sure that it’s plenty full so that the worms continue to want to come over in this direction, so I can already see bits and pieces of the food that I had placed in here.
I believe we’ve got some part of a vegetable or something like that. This is just bedding here. You can already see some of the worms that are hanging out down here enjoying the food. Here’s
the stem of a banana you can see here I’m using leaves. I’m not worrying about the use of leaves over here as bedding because this stuff will eventually just go with the worms. There’s coffee mixed in here, there’s a variety of different food items. Here’s some other chunks of maybe apple or something like that.
Never almost everywhere we go you’re going to notice worms congregating within this feeding area. It does feel a little bit dry, maybe not so bad. Now that I went a little bit deeper now I’m starting to hit some more damp material down here.
Moisture as important as food
Maybe there was a banana peel or something or some other kind of gooier or stickier moisture material down here. But I think that moisture over here is almost as important as the food that you’re putting in here to lure them over because as much as they might be hungry and looking for fresh supply of food.
They could just as equally be feeling the dryness in the finished compost and they might be actually looking for a more damp comfortable place to to reside so things seem pretty good over here. I can’t complain.
I thought it was a little bit dry at first when I started poking around in here, just based on the feel of some of these leaves a little crumbly a little crunchy, but I don’t think it’s too bad. I think, when I put the plastic back on, I’m just gonna do so in a way that makes sure that the moisture is pretty well contained.
Using plastic to lock in moisture
So I’m going to try to position the plastic over this in a way that really locks in the moisture as best as possible, by trying to make sure I’m going all the way out to the edges here. Even here. This piece of paper that’s on top.
I can still feel the moisture on that too. So all the moisture that’s recirculating in there is going to make its way into this cardboard. It’s, going to make its way into this paper, and I’m sure that all of that also contributes to the moisture making its way into the dryer section of this and having a chance to evaporate out.
So it’s at this point that this piece of plastic really plays a key role in maintaining the moisture down here within the feeding area. So I think one other thing i’ll, be doing in here soon is probably coming in here to replenish the food in there just to make sure that the the moisture is kept where I want it, as well as the food that’s there to try to bait the worms out of the finished compost, so that’s pretty much where we stand with this bin.
The results
It seems to be making some pretty decent progress, but it’s going to take longer than it did in the last bin that I had, and I’ve known that for some time now ever since the bin got really wet, and ever since I added a lot of leaves, i already knew that I was extending the overall time that It would take to get this worm bin to the finish line and that’s fine. It’s not a big deal. It’s, all learning process to me, and it all ends up good.
It just doesn’t always you know, follow the timeline that you might have expected when you started so you got to be patient in very many cases and then you’ll end up with the results that you want all right.

Worm Composting: How to Make a Wormery
Compost Worm Escape!