Worm Composting: How to Make a Wormery
[WPXperVideo id=32 ]
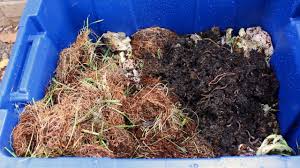
Worm composting
Worm Composting. Wonderful, wondrous wiggling worms -they’re just magnificent and the starting point to healthy soil and awesome compost. Traditional compost heaps like this one here are full of them, but there is another way to turn kitchen scraps and weeds into nutrient-dense goodness – by using a wormery. Intrigued? Then keep watching, because in this video we’ll show you why worm composting rocks and show you how to make a budget-friendly wormery of your own.
Wormeries
Wormeries, or worm composters, use special composting worms to turn kitchen waste into nutrient-dense compost and liquid fertilizer. They don’t smell, take up very little space, and are a great way to introduce children to the wonders of worms. Use one as a standalone composting solution for courtyard or balcony gardens, or as a complement to a traditional compost heap or bin. A wormery is typically made up of at least two compartments. The bottom compartment is where the liquid collects, which can be drained off to use as a liquid feed for your plants.
The top compartment is where your worm is will live. It’s also where you’ll add your kitchen scraps to feed them. This is also where your compost or worm castings will be made. The lid here keeps everything from drying out or getting flooded during a rain shower. Our wormery uses three compartments, providing an additional tray that
makes it easier to collect the worm compost. Holes in the bottom of both the middle and top trays ensure that the liquid produced by the worms can percolate down into the collection tray at the bottom. And once the tray is full, they enable worms to migrate up into a new tray so that compost from the vacated tray can then be harvested.
Assembly
The trays we’re using are about 16×20 inches (40x50cm) and fairly shallow at just 8 inches (20cm) deep. You’ll also need a plastic faucet or water barrel tap, a drill and drill bits, and a lid for the top tray. You’ll also need some worms of course, but don’t be tempted to use earthworms from the garden. They’re great at tunnelling and improving our soil, but not so quick at worm composting. I ordered these ones online. They’re a lively mix of European night crawlers and tiger worms which are capable of eating twice their body weight a day!
So let’s assemble the wormery. First, the bottom tray. Carefully cut out or drill a hole to snugly fit the thread of the faucet. Fit it as low as possible in the tray so that liquid isn’t left at the bottom when you drain it off. Screw it tightly into position, then secure with the back nut. You can raise the wormery up on bricks to make it easier to drain off the liquid. Now let’s get on and drill those holes in the top two trays. Drill quarter-inch (1/2 cm) holes approximately every 2 inches (5cm) right across the bottom of both trays. We’ll also drill a single row of holes near the top of the two trays at the same size and spacing. These holes will help to improve air flow, creating a healthier environment for your worms.
Add the worms
OK, now for the fun part – time to add our worms! I’m starting with an 3 inch (8cm) layer of coir. I’ve dampened slightly to make it nice and comfortable for the worms. You could also use any really good quality compost. Now it’s time to add the worms. In they go! Now, they’ll soon bury themselves into
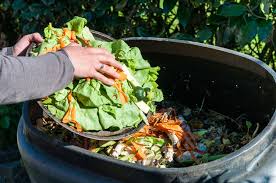
that lovely bedding material and get settled in. Now it’s time for our kitchen scraps. To start with you just want to add about 2 inches (5cm) so as not to overwhelm them and so they can settle into their
new home in peace. And finally a layer of burlap or hessian,just to keep them nice and snug while they settle in.
Now I won’t add any more material for about a week until they’ve properly settled in. Worms like moist, warm conditions so keep your wormery somewhere shady, and as close to room temperature as you can. They don’t like to be frozen so move the wormery indoors for winter. Into a garage, outbuilding or utility room is ideal. Add food a little at a time to the top of the compost. Avoid adding too much food at any one time, as this risks creating an odor that will attract flies. The worms will digest any kitchen scraps, including coffee grounds, but avoid meat or animal products such as cheese which can attract flies.
Avoid citrus and garlic
Go easy on citrus peel and alliums like onion and garlic too, as large amounts will make conditions too acidic for your worms. You can also add small amounts of weeds and leaves, as well as shredded non-glossy newspaper or torn up cardboard. Once the top tray’s full, swap it round with the empty middle tray and start filling that instead. The worms will migrate up through the holes to where the food is, leaving the full tray empty of worms and ready for collection. Repeat this process each time the active tray becomes full up . The worm compost, or ‘castings’, make a great all-purpose soil conditioner, or add them to your own potting mixes to give them a nutritional boost.
Drain the liquid off from the bottom tray whenever it collects. This nutritional liquid, often known as worm tea
or worm wee, is a super elixir for your plants. Stir one part of the liquid into ten parts water before using. And there you have it. A genuinely superb homemade wormery that will keep you in wonderful
Advertisement
A link to worm composters on Amazon
What to feed your Red Wiggler Worms

Make Nature’s Best Garden Fertilizer FREE