How to Build A Worm Compost Bin
How to Build A Worm Compost Bin
Today my my worms arrived, they came in a little early. I wasn’t expecting them for a couple days so I’m having to kind of scramble to get things setup. Basically what I’m going to do is create a composting worm bin, actually two ultimately, but I’m going to start with one. And use the castings in my raised bed, in my wicking garden, and for my plants. So here’s a quick tutorial on how to do that.
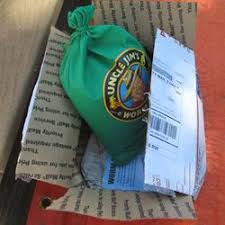
First of all I looked for and purchased a big block coconut coir and now this is pretty rigid. You simply add some water and it becomes this really fine moist material the worms are going to love that. Now I’ve added, for about a third of this block, I added one whole bucket plus about two-thirds of another and it popped up in created all this. I have taken and shredded some newspaper and I’m going to build the bin into this bucket okay, which I have not done anything with . . it’s just like this one. We’re just going to drilled a few holes in this. Now, for this I’m just going to use standard drill bits. I’ve placed that in my drill motor. And I’m going to drill like three or four holes down here, three of four holes down here. I’m gonna cover that with cloth so they can escape but it is going to allow the moisture to seep out in the event I get it too wet in there Okay, so on this can take my . . actually, I have my smallest drill bit possible here, I’m just going to drill, like, three or four holes down here. I am drilling it on the smallest, or the . . rather the lowest point on the bucket. Okay, and drill four more down here. Now it will be important for me to cover the holes, even though they’re tiny, they are going to have babies, and baby worms are even smaller than adult worms obviously and baby worms might be able to get out that. So, I’ve got them in here, this is how they come. Thank you to Uncle Jim’s for sending the worms Ok, and what I’m gonna do is take his advice there’s a video that he’s put out there about how to cause the worms less stress when you first get them.
So I’m going to go in and I’m going to get my tape and my have cloth, and I’m going to get this covered and I’ll be right back. One quick note they were shipped with a couple pieces and newsprint down here and I’m going to shred this and put it in here and I know that there are people out on the internet that say you should not use up colored ink, and I would like to let you know that this is newsprint and the ink that they use on these type of circulars is soy based, so it shouldn’t harm the worms, at all. So feel free. Anything that comes delivered to your paper, or delivered to your doorstep by the newsboy is safe to use. Okay, for this next step I’ve just taken an old washcloth that’s clean, and I’ve cut it into a couple strips that are pretty small, they’ll fit right down over the hole, the holes that I drilled in. You notice I did drill them all in a line. So, there’s both of those laid down. I’m just going to tape these down before the next step. Okay so here next step is complete. As you can see have taken that washcloth and have taped it down using some duct tape. Now obviously this is not ideal. But my shade, my weed cloth has not yet arrived and my worms have so I have got to give them a place to be,so what I’ll do is I’ll will replace each side when I do that first casting harvest.
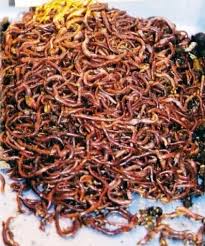
Okay so that’s the next step now, I’m going to build the bed. And basically what I’m going to do is take this really rich coconut coir, which as you can see if I squeeze can you see this? I’m getting a drop or two but that’s all I’m getting, it’s not running, it’s not flowing over my hand, it’s really its damp, it moist but it’s not too moist. This is a really good place you want to be. So I’m just gonna take and put this into this bucket, and fill it up to about right here okay and then may take my shredded newspaper put it in and then I’ll check back in with you. Nice good bed for them so and I’m just going to take my worms, and open this bag . . . . they’ve been pretty stressed everything’s that’s going on, so I’m gonna try not to add to that They did warn me, you know, that traveling does stress your worms. So I don’t know if you can tell,they’re pretty lethargic, and not moving around quite a bit and that’s normal, just give them a minute to acclimate. One thing I am going to do, is I’m going to move this in the sun a minute to kind of drive them down into the dirt so they can find their new home. So, they’re going to be heading, heading south.
Now, it’s been a few minutes and as you can see most to the worms have headed south. I can still see a couple you know right up here. He’s moving kinda slow and that’s fine. I’m now ready to take the next step which is to take my newspaper they can to give them some shade over here, so newspaper does a couple of things, allows them to come up to the surface to feed on the material that I’m going to put in here, and it still protects them from the light. Worms really like it dark. I’m also going to wet this down so it’s going to be like a moisture barrier for these guys. Its going to hold moisture in, down to where they need it. So I’m just going to sprinkle some water across a top, I’ll be right back okay for this next step, I’ve gone in and got my compost as you can see, I tend to break these down pretty small. The smaller it is the easier it is for them to eat. Even when I’m cutting salads, I go through and I go ahead and give this a little extra chop the stuff that’s gonna go in here. Now because my worms came early, I wasn’t quite expecting them. I don’t really have a whole lot of food. Now that’s okay because they’ve been traveling, they’re not in a real big hurry, they’re going to take a while to get acclimatized so I had time to build some up in the meantime, I thought I’d add . . I’ve got some stale bread crumbs I thought I would add something that is well to kinda help, you know, get ’em jump-started into getting acclimatized. So, now . . the secret to worm gardening is to divide this up into six zones and each time you feed them you feed them in a different zone, this will cause them to migrate to where the food is each time, causing them to go through the dirt now I’m going to start in this right hand corner and I’m just gonna pull they’re little sunshade back. And I’m going to dig down a little bit and I’m gonna drop some food right on top. So. I’m just going add the breadcrumbs. This will help them with their gizzards, help them digest. And then I’m going to put my compost right here in this same corner. Pull this back over, and then put their shade back on. So, that’s it.
Right now, they really would probably like me to leave them alone so I’m going to put their lid on we’re going to call it good. Now, this is not the lid that goes on here. I’m going to need to drill some holes and put some more shade cloth. So, for right now I’m just going to cover,get them dark, help them relax. And I’m going to take and cut holes in the other lid back here and then replace it when I’m done. Okay, here’s the finish lid, I’ve put a few holes in here,about a half inch around that’s going to provide good oxygen but they don’t like light, if you’ll recall, and again, my shade cloth isn’t here. So what I’m going to do temporarily is just take a dark cloth and fold it over in half and cover the holes and I’ll tape this down. Again I’m not worried about them escaping, they can’t climb up to get out, but I do want to keep it from the wind blowing it off. So I’m going to tape that on then that’s the last step, that’s the worm bin. K there it is all taped down, just keep the wind from picking it up and blowing it off. I’m just going to store it on the bottom shelf and let ’em get busy making wormcastings for me.
Ok, and next time we’ll cover a setting up the raised bed garden. I’ve got the area almost cleared, its all good to go. My blackberries arrived today, again, ahead of schedule. So I gotta get those in PDQ, I’ve just dropped them in a couple of little pots for now. Thank you Uncle Jim’s. Worms look great
Top 10 Best Vermicomposting Tips

Make Nature’s Best Garden Fertilizer FREE