How to Make Vermicompost
I started normal composting and vermicomposting a year ago in 2016 where I realized that composting is a mere waste of time and vermicompost is the only “Go To” thing when you need a super rich organic fertilizer in a very short period of time.
See, composting really takes a long period of time in comparison to vermicomposting. A few days later, out of curiosity, I started looking for how to make vermicompost better? We already know that and it has been proven several times that the vermicompost is the best organic fertilizer till date, which can be produced naturally. So here I am not talking about those organic or bio-fertilizers which are prepared in labs or industries under controlled environment. When we are talking about natural production, vermicompost is the best and the way to go. But the question here is, How to make things better than the best? I mean, How to make the best organic fertilizer a better one by adding some extra nutrients or supercharging it by increasing the microbiological activities. All the videos or blogs or articles which I came across suggested to use some additives to supercharge the vermicompost. But, many of those additives were not available easily or are expensive, for example: peat moss, rock phosphate, bone meal, oyster shells, etc. There are many of them which are available over the counter but are expensive. So, let’s get started with supercharging the vermicompost, making the supercharged vermicompost without any expensive things and with general household things.
Let’s get started. Here I’ve segregated all the additives in parts where we will be traversing in a progressive manner from left to right and you can stop at any part you want. I mean, you can also choose your parts, whichever you like or It’d be better if you take all the parts seriously and include them in your vermicompost. Also, I’ll be giving a short and sweet reason of considering each thing to be an additive in this process. I will also suggest the replacements or additional additives which could’ve been a part of this but aren’t available as of now.
Number 1: Dried Cow dung: This is basically a sufficient meal for your worms to thrive in. They will love to eat this. It has got almost all the required macro and micro nutrients. And this will make the major proportion of my vermicompost mix. Alternatively, you could’ve used the waste of chicken, goats, sheep, rabbits. Or, maybe you can search over the internet about what all animal wastes are fit for your compost bin. Number 2: Green and Brown waste: Here we are trying to maintain C:N ratio, as green being the Nitrogen part and brown being the carbon part. Here we have grass and leaf clippings in the greens and shredded newspapers and cardboard in the browns. Number 3: Banana peels:These are amongst one of the quickest degradable kitchen waste and are too soft. Sufficing the basic requirements for anything earthworms love to eat. In addition to that, these peels are rich in Potassium and Magnesium. You can also use banana pieces directly. Your worms will love you for this. You can replace these with Spinach, Grapes, Watermelons, tomatoes, pumpkins, etc for potassium enrichment. Make sure you remove the seeds before tossing them here in the compost pile, specifically those which have small seeds like that of the tomatoes, they sprout in quite quickly and you’ll end up having several tomato plants all over your garden. Number 4: Jaggery: If you are in India, you’ll find this easily over the counter for a very cheap price. We call it ‘Gur’, here. It provides essential minerals including Iron, Potassium, Magnesium, Manganese, etc. . The benefits beyond the minerals are the natural sugar content that will feed the microorganisms in the compost. The readily available sugar content will skyrocket the microbial activity. And by ‘SkyRocket’, I mean that all the good bacteria in the compost are going to multiply exponentially. The main idea behind adding this is to increase the micro-biological activities which eventually accelerates the process of vermicomposting. You can replace this with molasses which would more or less provide similar benefits.
Number 5: Flour: We are using 2 types of flours here. The first one is whole wheat flour And the second one is gram flour. We are adding these for providing micro-nutrients such as Zinc, Magnesium, copper, iron, manganese,etc. . They also contain traces of potassium and phosphorus and sometimes they really contain more than traces of these minerals. What I’ve noticed here is, adding flour to your bin will keep your earthworms healthy and active. Apart from these, you can add corn meal, oat meal, etc. Cautions for adding flour to the bin: Firstly, rodents love flour and can easily take over your bin – so, mixing it in will help. Secondly, a layer/lump of flour is pretty compact or dense and could reduce the airflow in your compost heap – again, stirring it into the heap will lessen that issue. So remember, always mix it thoroughly while adding into compost bin. Number 6: Beach Sand and local soil. Get a 1/4th glass of beach sand which would serve as grit in the gizzard of the earthworms. In layman’s terms, this will help earthworms in grinding the food particles as they don’t have any teeth. The local soil, any local soil. You may have the black cotton soil or the red soil or any soil which is local to your city. The local soil has to be collected from under a tree. Select a tree whose leaves are not collected when they fall and are allowed to decay under the tree itself. You may find this in abandoned places, abandoned plots or government areas or forests. To avoid this expedition, if you happen to mulch your garden with organic matter like wood chips or dried leaves, you can grab a handful of soil from under that mulch. The whole idea is to accelerate the microbiological activities in our compost by bringing in the beneficial bacteria. There are plenty of bacteria under that natural mulch. If you are unable to find this soil, don’t just add soil from any other source. It may not help, rather it may act adversely. In the place of sand, you can use fine grounded egg shells and well rinsed coffee grounds. These are the best things you can use as grit. These two aren’t available for me, so I’ll go with the sand. Number 7: Neem: Adding neem leaves to this mixture makes the end product a combination of “fertilizer and pesticide”. It considerably reduces the impact of the unwanted pests, rodents, etc. You can also use neem fruit pulp and crushed neem seeds. Believe it or not, earthworms love neem leaves and its seeds. There were studies conducted in some institute which say that those earthworms which were given neem leaves and seeds to feed were breeding and multiplying faster than those who were on a regular diet. So, it is a win-win situation for you if you add neem leaves or seeds or both. Okay, so lets mix these ingredients together. . . . . . . I’ll add a couple of glasses of water, or may be more to just moisten the mixture. We don’t want to make it too moist otherwise worms will want to leave your bin as soon as they are introduced there. Also, we don’t want to keep things dry as they don’t like it either.
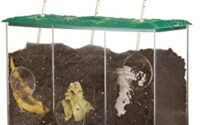
I have used a variety of worm bins and worm towers, but this one is my favorite due to its shape and ventilation. This is a bamboo basket, thoroughly washed and dried out under the sun for hours to remove any unwanted smell. I will put some bedding at the bottom and will cover the walls with paper towel for making it a bit of cozy environment for the worms. They are eventually going to eat this paper towel. Let’s put our mixture into this basket. Now is the time for introducing the worms into this bin. I will separate our mixture with the worms with a nice moist paper towel and will leave it to them to chose their own sweet time to enter our super mixture. They may take a few hours but eventually the process is going to start. Don’t worry about that. I’ve noticed that if we put them directly into the mixture, a few of them tend to rush away and try to escape. Whereas, following this method, I’ve never seen any worm escape the bin right after their introduction. I’ll put a layer of vermicompost and Lets bring in the earthworms. These are the Indian blues or Malaysian Blues. I’ll put the scientific name in the description. They originated from somewhere around the great Himalayas and have migrated their way to the countries around it. I prefer them over the likes of Red wrigglers or the african night crawlers because these are local worms and they do thrive well in the Indian weather. I’ll cover this with a piece of cardboard and a moist piece of cloth. That’s it. We are good to go. I will post another video for the updates on this bin and tell you more about vermicompost benefits.
Five Tips to Make Garden Compost Faster
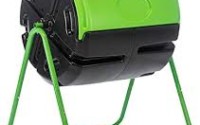
Backyard Vermicomposting Essentials